15 KiB
一、系统配置
-
操作系统
RockyLinux9.4 -
修改
IP地址
vi /etc/NetworkManager/system-connections/ens192.nmconnection
-
重启网络
systemctl restart NetworkManager.service -
常用软件安装
yum update -y yum install wget net-tools tar -y -
系统优化
vi /etc/systemd/system.conf

# 全局的打开文件数
DefaultLimitNOFILE=2097152
# 全局打开进程数
DefaultLimitNPROC=65535

vi /etc/sysctl.conf

# 全局:端口最大的监听队列的长度,可为:32768
net.core.somaxconn=32768
# 内存分配模式:1为不限制
vm.overcommit_memory = 1
# 单进程打开文件句柄数
fs.nr_open = 2097152
# 系统打开文件句柄数
fs.file-max = 2097152

# 大i/o独立部署中间件选配,例如:redis、队列、数据库等;
# 请求连接保存在队列中的最大数目
net.ipv4.tcp_max_syn_backlog=16384
# 网络接口接收数据包比内核处理速率快时,允许送到队列的数据包的最大数目。
net.core.netdev_max_backlog=16384
# 每个tcp连接占用内存,共三个值:最小字节数 默认值 最大字节数
net.ipv4.tcp_mem = 786432 2097152 3145728
# 每个tcp连接的读缓冲(接收缓冲),缓存从对端接收的数据,后续会被应用程序读取
net.ipv4.tcp_rmem = 2048 32768 4194304
# 每个tcp连接的写缓冲(发送缓冲),缓存应用程序的数据,有序列号被应答确认的数据会从发送缓冲区删除掉
net.ipv4.tcp_wmem = 2048 8192 2097152
添加完成后,刷新内核参数,立即生效:执行命令
/sbin/sysctl -p调整用户组的资源限制
vi /etc/security/limits.conf # 用户会话的 打开文件句柄数 * soft nofile 1048576 * hard nofile 1048576 # 用户会话的 打开进程数限制 * soft nproc 65535 * hard nproc 65535 -
需重启生效,检查是否生效
#用户级别的系统配置 ulimit -a #open file文件限制数 ulimit -n #进程限制数 ulimit -u -
关闭
SeLinux# 临时关闭 setenforce 0 vi /etc/selinux/config 改:7 SELINUX=enforcing #前面的 7,表示文档中第 7 行。方便你查找 为:7 SELINUX=disabled -
关闭防火墙
#关闭 systemctl stop firewalld #设置开机不启动 systemctl disable firewalld -
重新启动
reboot
二、DataEase安装
安装Docker,Docker Compose
yum install -y yum-utils
yum-config-manager --add-repo https://mirrors.aliyun.com/docker-ce/linux/centos/docker-ce.repo
sed -i 's+download.docker.com+mirrors.aliyun.com/docker-ce+' /etc/yum.repos.d/docker-ce.repo

yum makecache

# 安装最新版本Docker
yum install docker-ce docker-ce-cli containerd.io docker-buildx-plugin docker-compose-plugin -y

# 下载Docker Compose的最新版本
curl -L "https://mirror.ghproxy.com/https://github.com/docker/compose/releases/download/v2.31.0/docker-compose-linux-x86_64" -o /usr/local/bin/docker-compose

 curl -L "https://dsideal.obs.cn-north-1.myhuaweicloud.com/HuangHai/docker-compose-linux-x86_64" -o /usr/local/bin/docker-compose

# 赋予执行权限
chmod +x /usr/local/bin/docker-compose

# 验证安装
docker-compose --version
在线安装
curl -sSL https://dataease.oss-cn-hangzhou.aliyuncs.com/quick_start_v2.sh | sh
访问办法
- 访问地址 : http://10.10.14.205:8100
- 登录用户名: admin
- 登录密码: DataEase@123456
在线升级
dectl upgrade
开发环境版本
dectl version

current version is v2.10.1
安装历史版本
wget https://dataease.oss-cn-hangzhou.aliyuncs.com/quick_start_v2.sh
历史版本号
latest_version=$(cat /tmp/de_latest_release)

# 黄海添加的历史版本号
latest_version="v2.10.1"

echo "开始下载 DataEase ${latest_version} 版本在线安装包"
开始安装
chmod +x *.sh
./quick_start_v2.sh
三、对外暴露数据库端口
Q、如果在线修改数据库中的表,以达到大屏数据直接修改的目的,而且最初的大屏是产品经理使用Excel进行模拟数据进行设计的,并不是真正的Mysql数据源,能不迁移到Mysql数据源就达到这个修改的目标吗,全部迁移到Mysql的数据源还有好多工作要做,太麻烦~
A:可以采用两个步骤来完成这个目标:
-
将
Mysql数据库的3306端口暴露出来,让JAVA可以连接上修改
Mysql可以使用局域网IP访问
vi /opt/dataease2.0/docker-compose-mysql.yml
添加
ports:
   - "0.0.0.0:3306:3306"
DataEase自己带的Mysql数据库就可以通过宿主机IP+3306来访问到了。
重启动
/usr/local/bin/dectl restart
数据库用户名与密码
root
Password123@mysql
通过修改其中的数据集完成修改工作
查询数据表
-- 数据源表
-- core_datasource
select * from core_datasource where name like '%岐山%';

-- 数据集组
select  * from core_dataset_group where name like '全省人口变化总体趋势预测';  -- id=1033797259734683648

-- 数据集表
select  table_name from core_dataset_table where dataset_group_id='1034544942506184704';

-- 查询或者修改
select * from `excel_人口变化趋势_e1c9395feb`
更详细的见项目代码。
Q:我想在主页面显示云南省的地图,然后点击地图中某个城市,比如昆明市,进打开一个新的页面,里面是昆明市的地图,如果点击的是楚雄州,打开的新的页面就是楚雄州的地图,并且,要求不能开发16个市州的页面,那样太麻烦了,我只想开发一个市州的页面,让第一页省地图将参数传递到市州的页面,完成类似于钻取的工作,可以吗?
A: 目前的DataEase V2版本支持外部参数向仪表盘类组件传递参数,但对于地图是不支持的,地图是哪个地区,必然在页面上指定:
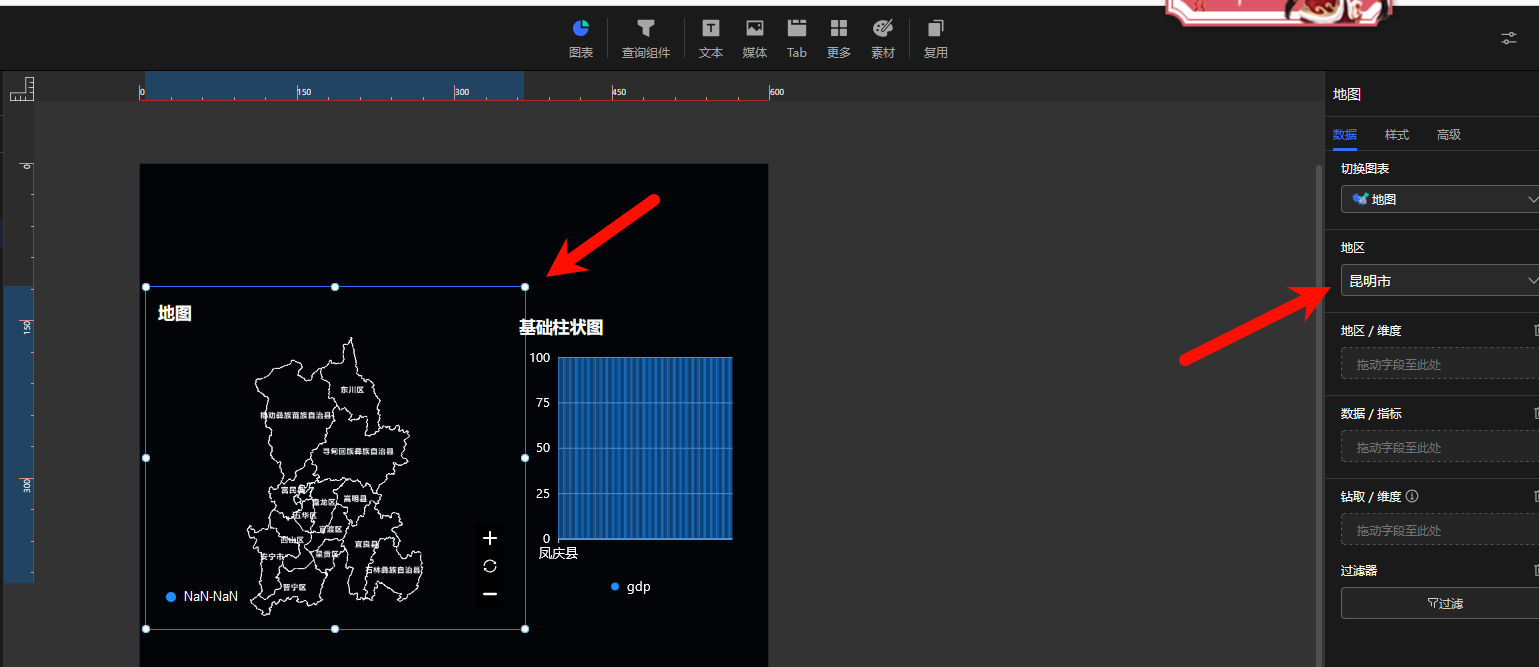
这样一来,上面的需求就无法满足了。
只好继续使用黑科技!
找到记录某个大屏使用了哪表记录上面的地区信息:
select * from data_visualization_info where name ='黄海测试的市州地图';
-- 1049327041104711680	黄海测试的市州地图

-- 配置值
select * from core_chart_view where scene_id=1049327041104711680 and type='map';

返回的字段custom\_attr中有是哪个地区的配置信息:
"map":{"level":"city","id":"156532300"}
很明显
level:[province,city,district]

156530102:五华区
156530100:昆明市
上baidu查找了一下,DataEase中区划表执行的是:
由于本次项目只是云南省的市/州就可以了,所以我们只需要找出下面的数据即可:
DROP TABLE IF EXISTS `t_city_code`;
CREATE TABLE `t_city_code`  (
  `area_code` varchar(255) CHARACTER SET utf8mb4 COLLATE utf8mb4_0900_ai_ci NULL DEFAULT NULL COMMENT '地区行政区划码',
  `area_name` varchar(255) CHARACTER SET utf8mb4 COLLATE utf8mb4_0900_ai_ci NULL DEFAULT NULL COMMENT '地区名'
) ENGINE = InnoDB CHARACTER SET = utf8mb4 COLLATE = utf8mb4_0900_ai_ci ROW_FORMAT = Dynamic;

-- ----------------------------
-- Records of t_city_code
-- ----------------------------
INSERT INTO `t_city_code` VALUES ('156530100', '昆明市');
INSERT INTO `t_city_code` VALUES ('156530300', '曲靖市');
INSERT INTO `t_city_code` VALUES ('156530400', '玉溪市');
INSERT INTO `t_city_code` VALUES ('156530500', '保山市');
INSERT INTO `t_city_code` VALUES ('156530600', '昭通市');
INSERT INTO `t_city_code` VALUES ('156530700', '丽江市');
INSERT INTO `t_city_code` VALUES ('156530800', '普洱市');
INSERT INTO `t_city_code` VALUES ('156530900', '临沧市');
INSERT INTO `t_city_code` VALUES ('156532300', '楚雄彝族自治州');
INSERT INTO `t_city_code` VALUES ('156532500', '红河哈尼族彝族自治州');
INSERT INTO `t_city_code` VALUES ('156532600', '文山壮族苗族自治州');
INSERT INTO `t_city_code` VALUES ('156532800', '西双版纳傣族自治州');
INSERT INTO `t_city_code` VALUES ('156532900', '大理白族自治州');
INSERT INTO `t_city_code` VALUES ('156533100', '德宏傣族景颇族自治州');
INSERT INTO `t_city_code` VALUES ('156533300', '怒江傈僳族自治州');
INSERT INTO `t_city_code` VALUES ('156533400', '迪庆藏族自治州');
四、外部参数的处理办法
https://www.jianshu.com/p/cc9982e986f5
1、省通过跳转设备 转到JAVA接口,填写如下:
http://10.10.21.20:9000/dsBase/dataease/route?city_name=[city_name]
其中[city_name]是在省地图上显示的热力数据,比如GDP=10000等
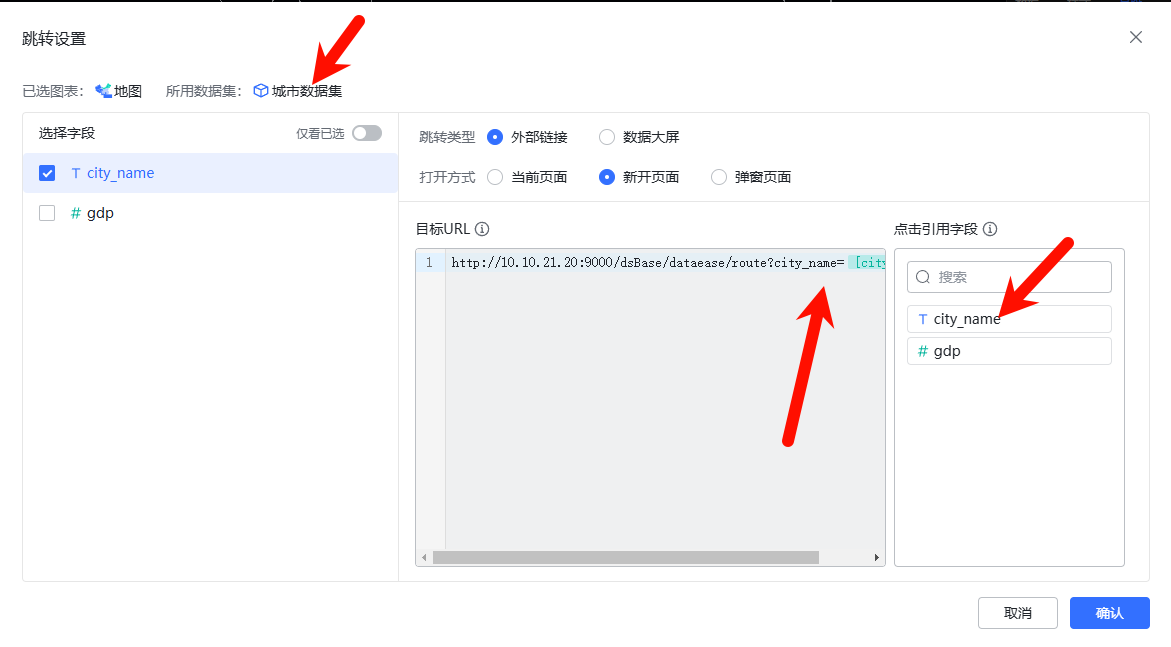
 // http://10.10.21.20:9000/dsBase/dataease/route?city_name=昆明市
 // http://10.10.21.20:9000/dsBase/dataease/route?city_name=楚雄彝族自治州
 // http://10.10.21.20:9000/dsBase/dataease/route?city_name=西双版纳傣族自治州
 // !!!必须发布后访问才能做到进入此接口,否则浏览器就走缓存,不进来这个接口了!!!
 /**
     * 路由跳转
     *
     * @param city_name 城市名称
 */
 @Before({GET.class})
 @EmptyInterface({"city_name"})
 public void route(String city_name) {
        //大屏名称
        String dataVisualizationName = BaseApplication.PropKit.get("dataEase.dataVisualizationName");
        //发布的地址
        String publish_url = BaseApplication.PropKit.get("dataEase.publish_url");

        //先更新一下数据表
        dm.updateCity(dataVisualizationName, city_name);
        //再拼接一下URL的最终地址
        JSONObject jo = new JSONObject();
        jo.put("city_name", city_name);
        String base64Str = Base64.encode(jo.toString());
        //跳转
        redirect(publish_url + "/#/de-link/zud8IQ8J?attachParams=" + base64Str);
    }
五、连接远程数据库
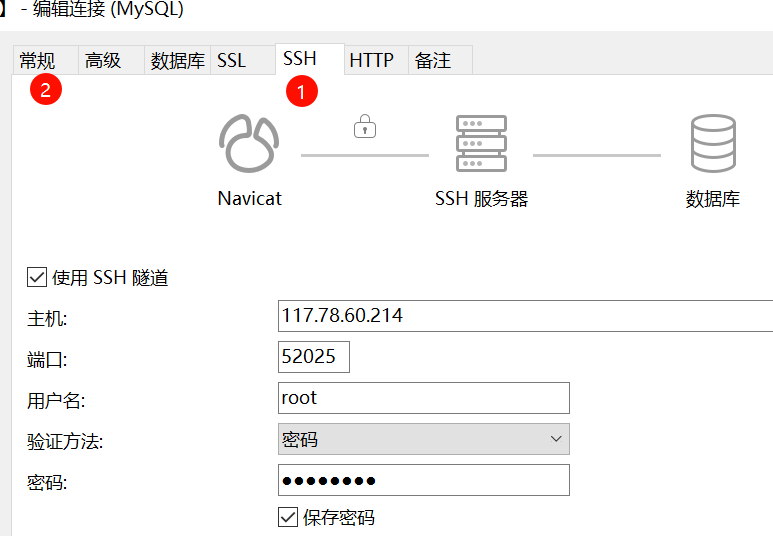
华为云部署主机的账号
117.78.60.214
52025
root
DsIdeal@123
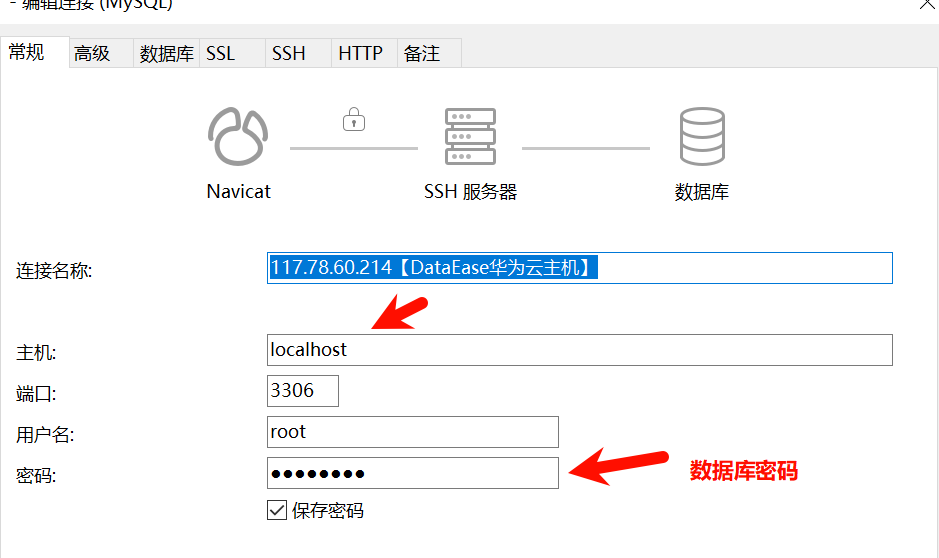
# 数据库用户名和密码
username: root
password: Password123@mysql

六、备份与还原
经反复实验,发现最好的备份还原方法是:
-
使用
NavicatPrenium备份还原数据库 -
手动备份还原图片
图片的位置
/opt/dataease2.0/data/static-resource

yum install zip -y
zip -r /usr/local/static-resource.zip /opt/dataease2.0/data/static-resource

sz /usr/local/static-resource.zip
七、集成Nginx发布【非必须】
1、80端口发布
拉取
docker pull swr.cn-north-4.myhuaweicloud.com/ddn-k8s/docker.io/openresty/openresty:1.25.3.1-5-alpine-fat
打标
docker tag swr.cn-north-4.myhuaweicloud.com/ddn-k8s/docker.io/openresty/openresty:1.25.3.1-5-alpine-fat docker.io/openresty/openresty:1.25.3.1-5-alpine-fat
编辑 nginx.conf
vi /root/nginx.conf
worker_processes  1;

events {
    worker_connections  1024;
}

http {
    include       mime.types;
    default_type  application/octet-stream;

    sendfile        on;
    keepalive_timeout  65;

    # DataEase 所在机器的IP
    upstream dataease {
        server 10.10.14.203:8100;
    }
    # 配置日志位置
    access_log /var/log/nginx/access.log;
	error_log /var/log/nginx/error.log;

    server {
        # 监听端口
        listen   80;
        # 监听域名(修改为你自己的域名,且域名与nginx所在服务器的IP绑定)
        #server_name  dataease.test.com;

        location / {
            client_max_body_size 600m;
            client_body_buffer_size 128k;
            proxy_connect_timeout 600;
            proxy_read_timeout 600;
            proxy_send_timeout 600;
            proxy_buffer_size 64k;
            proxy_buffers   4 32k;
            proxy_busy_buffers_size 64k;
            proxy_temp_file_write_size 64k;

            proxy_pass http://dataease;
            proxy_set_header X-Real-IP $remote_addr;
            proxy_set_header Host $http_host;
            proxy_set_header X-Forwarded-For $proxy_add_x_forwarded_for;
        }
    }
}
运行
mkdir /root/nginx_logs
docker run  --name openresty -d -v /root/nginx.conf:/usr/local/openresty/nginx/conf/nginx.conf -v /root/nginx_logs:/var/log/nginx -p 80:80 openresty/openresty:1.25.3.1-5-alpine-fat
2、用/dataease/发布
步骤1
vi /opt/dataease2.0/conf/application.yml
server:
  servlet:
    context-path: /dataease
步骤2
echo 'DE_CONTEXT_PATH=/dataease' >> /opt/dataease2.0/.env
八、离线更新
下载软件
https://community.fit2cloud.com/#/products/dataease/downloads
进入目录
tar -xvzf dataease-offline-installer-v2.10.3-ce.tar.gz
cd dataease-offline-installer-v2.10.3-ce
运行脚本
/bin/bash install.sh
查看状态
dectl status
修改Mysql可以使用局域网IP访问
vi /opt/dataease2.0/docker-compose-mysql.yml
添加
ports:
   - "0.0.0.0:3306:3306"
重新加载容器
dectl reload