|
|
### 一、安装 $ES$
|
|
|
|
|
|
**1、下载安装包**
|
|
|
|
|
|
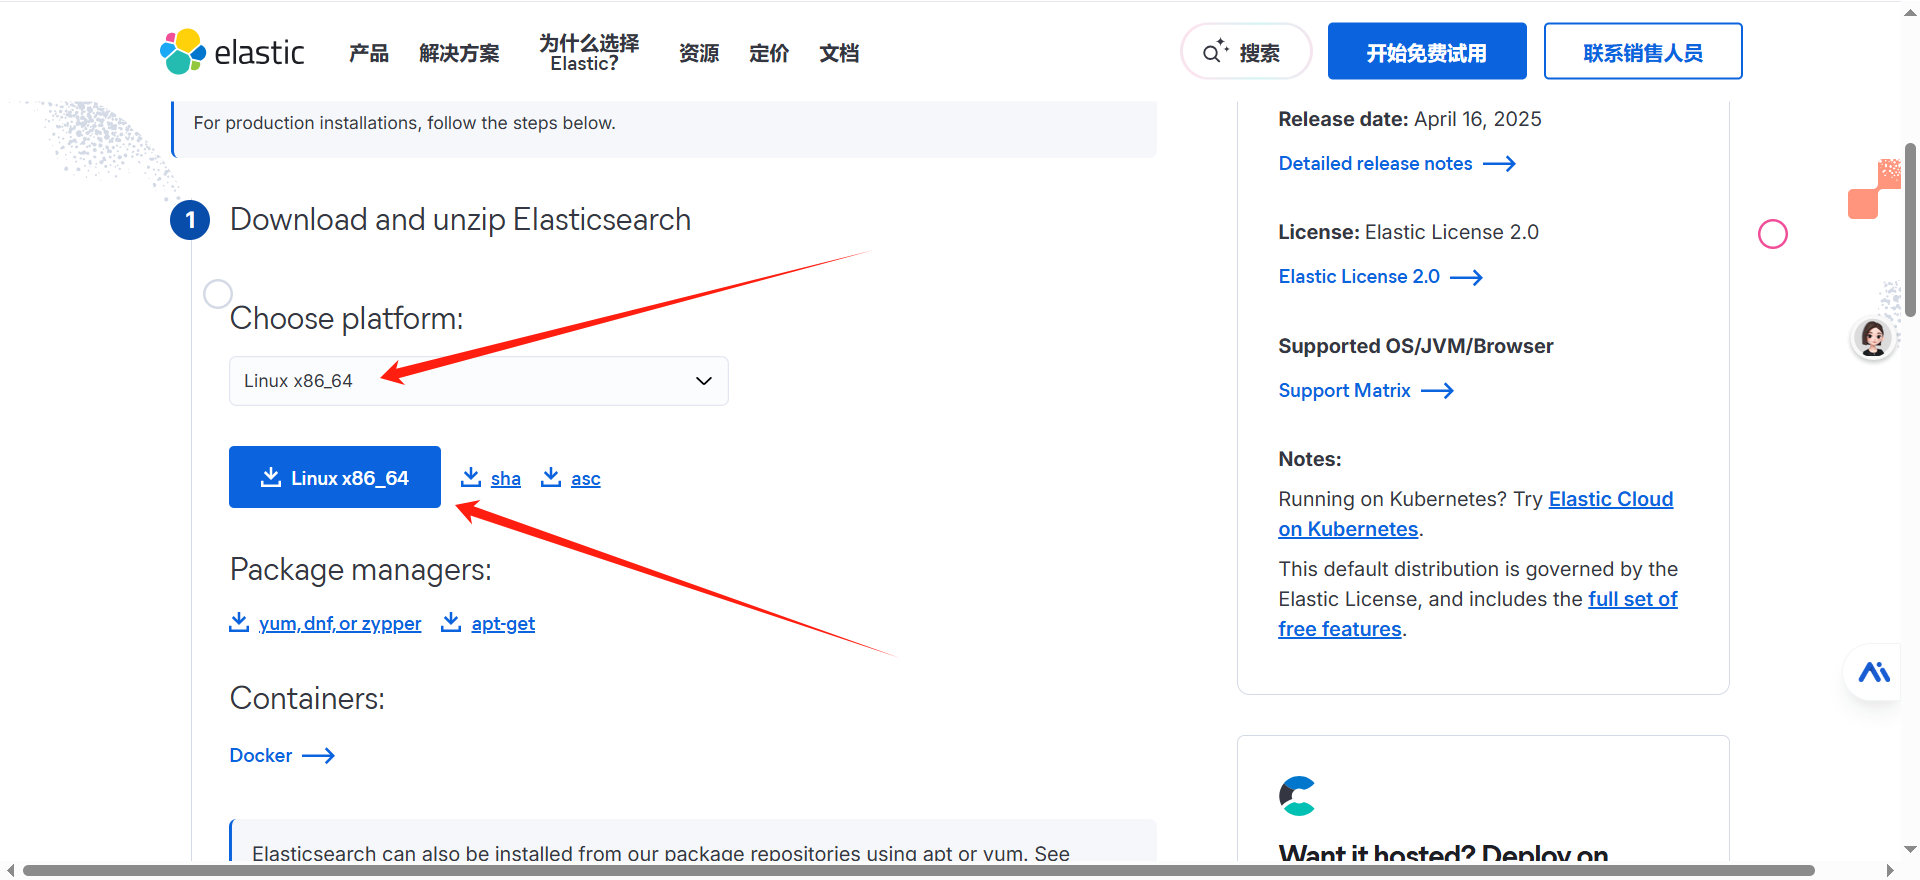
进入官网下载$linux$安装包 [下载地址](https://www.elastic.co/cn/downloads/elasticsearch)
|
|
|
|
|
|
|
|
|
|
|
|
**2、安装$JDK$$21$**
|
|
|
|
|
|
```sh
|
|
|
sudo yum install java-21-openjdk-devel
|
|
|
echo 'export JAVA_HOME=/usr/lib/jvm/java-21-openjdk
|
|
|
export PATH=$JAVA_HOME/bin:$PATH' >> ~/.bashrc
|
|
|
|
|
|
source ~/.bashrc
|
|
|
```
|
|
|
|
|
|
**3、上传文件到$linux$服务器**
|
|
|
|
|
|
```sh
|
|
|
# 如果没有 rz 命令 先安装
|
|
|
yum -y install lrzsz
|
|
|
|
|
|
# rz 打开弹窗 选择下载好的文件 确认 在哪个目录下执行,就会上传到该目录下
|
|
|
rz -be
|
|
|
```
|
|
|
|
|
|
**4、新建用户并设置密码**
|
|
|
|
|
|
```sh
|
|
|
# 创建用户
|
|
|
useradd elauser
|
|
|
|
|
|
# 设置密码 符合密码规范 大写 + 小写 + 数字 + 特殊字符 + 大于八位
|
|
|
passwd elauser
|
|
|
|
|
|
#输入密码:
|
|
|
DsideaL@123
|
|
|
|
|
|
tar -zxvf elasticsearch-9.0.2-linux-x86_64.tar.gz
|
|
|
sudo chown -R elauser:elauser /usr/local/elasticsearch-9.0.2
|
|
|
# 进入解压文件并编辑配置文件
|
|
|
cd elasticsearch-9.0.2/config
|
|
|
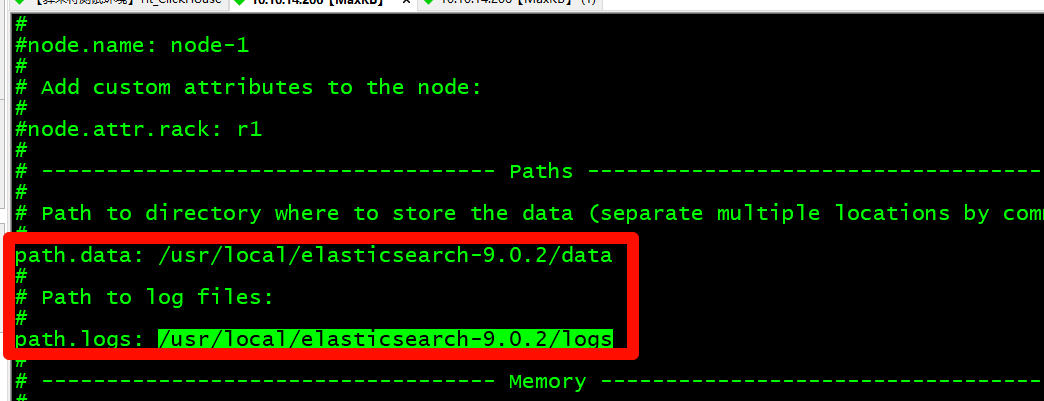
vi elasticsearch.yml
|
|
|
# 修改数据目录和日志目录
|
|
|
mkdir -p /usr/local/elasticsearch-9.0.2/data
|
|
|
mkdir -p /usr/local/elasticsearch-9.0.2/logs
|
|
|
```
|
|
|
|
|
|
|
|
|
|
|
|
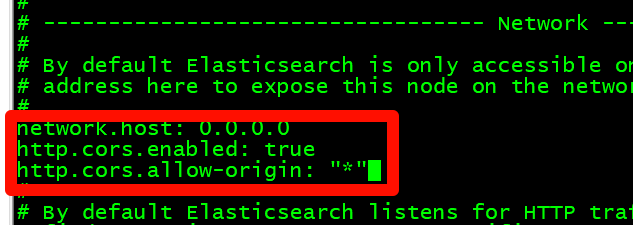
设置允许所有IP进行访问,在添加下面参数让$elasticsearch-head$插件可以访问$es$
|
|
|
|
|
|
|
|
|
|
|
|
```yaml
|
|
|
network.host: 0.0.0.0
|
|
|
http.cors.enabled: true
|
|
|
http.cors.allow-origin: "*"
|
|
|
```
|
|
|
|
|
|
**5、修改系统配置**
|
|
|
|
|
|
```sh
|
|
|
# m.max_map_count 值太低
|
|
|
# 临时解决方案(需要root权限)
|
|
|
sudo sysctl -w vm.max_map_count=262144
|
|
|
|
|
|
# 永久解决方案(需要root权限)
|
|
|
echo "vm.max_map_count=262144" | sudo tee -a /etc/sysctl.conf
|
|
|
sudo sysctl -p
|
|
|
|
|
|
# 验证是否有效
|
|
|
sysctl vm.max_map_count
|
|
|
```
|
|
|
|
|
|
**6、启动**
|
|
|
|
|
|
```sh
|
|
|
# 启动
|
|
|
su - elauser
|
|
|
|
|
|
cd /usr/local/elasticsearch-9.0.2/bin
|
|
|
# ./elasticsearch-keystore create
|
|
|
|
|
|
# 启动 -d = damon 守护进程
|
|
|
./elasticsearch -d
|
|
|
|
|
|
|
|
|
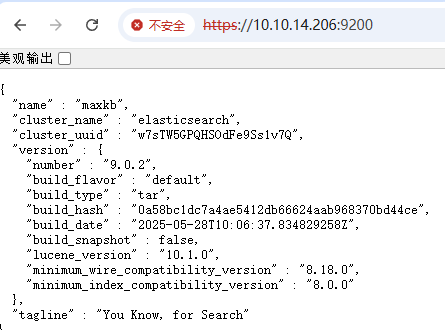
# 访问地址
|
|
|
https://10.10.14.206:9200
|
|
|
|
|
|
# 日志文件
|
|
|
/usr/local/elasticsearch-9.0.2/logs/elasticsearch.log
|
|
|
```
|
|
|
|
|
|
弹出输入账号密码,这里需要重置下密码,再登录 进入安装目录的bin目录下
|
|
|
|
|
|
执行下面命令 就会在控制台打印出新密码 账号就是 elastic
|
|
|
|
|
|
```
|
|
|
./elasticsearch-reset-password -u elastic
|
|
|
```
|
|
|
|
|
|

|
|
|
|
|
|
登录成功,完活。
|
|
|
|
|
|
```sh
|
|
|
elastic
|
|
|
jv9h8uwRrRxmDi1dq6u8
|
|
|
```
|
|
|
|
|
|
|
|
|
|
|
|
|
|
|
|
|
|
> **注意**:如果访问不到,请检查是否开启了$VPN$
|
|
|
|
|
|
### 二、安装$ik$中文分词插件
|
|
|
|
|
|
```bash
|
|
|
# 安装分词插件
|
|
|
./bin/elasticsearch-plugin install https://get.infini.cloud/elasticsearch/analysis-ik/9.0.2
|
|
|
|
|
|
# 检查插件列表
|
|
|
[elauser@maxkb elasticsearch-9.0.2]$ ./bin/elasticsearch-plugin list
|
|
|
analysis-ik
|
|
|
```
|
|
|
|
|
|

|